Product photography isn’t just about making something look good.
It’s about helping people buy confidently.
Today, customers don’t have the luxury of touching a product, feeling the material, or checking the details in person. They rely entirely on images to decide whether something is worth purchasing. That’s why product photography has become one of the strongest conversion drivers in ecommerce.
But here’s the twist: product photography in 2026 isn’t the same as it was a few years ago.
The tools are smarter. The workflow is faster. AI has made editing and background changes simpler. Customers expect more angles, more realism, and more context. And platforms prioritize clean, optimized images that load quickly and look consistent.
The good news is: you no longer need expensive studio gear to capture professional product photos. With the right product photography setup, some basic lighting, and a few proven techniques, even small brands can create images that compete with top ecommerce stores.
This guide covers everything you need:
- the best tools for product photography in 2026
- how to set up a simple and professional product photography setup
- the most effective photography techniques for online selling
- how to edit and optimize photos for ecommerce platforms
- a complete workflow for a photoshoot for online products
- how AI can improve your photography workflow without ruining realism
Let’s start with the foundation.
Why Product Photography Still Matters More Than Ever
You can have the best product in your category. But if your photos look average, customers assume the product is average too. Product photography does three major things:
- It builds trust
- It creates perceived value
- It reduces friction in decision-making
When the product looks clear, detailed, and consistent across all images, your store feels professional. That increases confidence, which increases conversions. And in 2026, where competition is higher than ever, customers decide fast.
If your product photos don’t look instantly credible, they move on.
Product Photography in 2026: What’s Changed?
The biggest change isn’t cameras. It’s expectations.
In 2026, most customers expect product images to include:
- clean background shots
- lifestyle shots that show scale and context
- multiple angles
- close-up detail shots
- consistent lighting and color across the product page
- faster loading images (optimized for mobile)
Brands also need images for multiple channels, including:
- ecommerce product pages
- short video content
- social platforms
- ads
- marketplaces
- email promotions
So the new requirement is simple: You need a system that produces high-quality images quickly and consistently.
That means:
- a reliable product photography setup
- a repeatable workflow
- smart editing tools
- and AI support where it makes sense
Essential Tools for Product Photography in 2026
Let’s break down the tools you need into four categories:
- Camera tools
- Lighting tools
- Setup tools
- Editing and optimization tools
You don’t need everything on day one. But understanding the options helps you build a setup that fits your budget and product type.
Camera Tools: What to Use in 2026
Choose a camera setup that matches your product type and workflow—because lighting and consistency matter more than having the most expensive gear.
Smartphone vs DSLR vs Mirrorless
In 2026, the smartphone vs DSLR debate is less important than people think.
A smartphone can absolutely produce professional product photos if:
- you use good lighting
- you stabilize the phone
- you shoot in high resolution
- you edit properly
A DSLR or mirrorless camera becomes worth it when:
- you want full control over depth of field
- you shoot in low light
- you need professional consistency at scale
- you want stronger close-up and macro results
When a smartphone is enough
A smartphone is enough if you sell:
- small accessories
- apparel basics
- beauty and skincare
- simple products for marketplaces
- budget-friendly ecommerce catalog items
When a camera upgrade is worth it
A DSLR or mirrorless upgrade is worth it if you sell:
- premium products
- jewelry or detailed items
- reflective products like glass or metal
- luxury items where details matter
- products where zoom quality matters
If you're starting out, focus on setup and lighting first. That matters more than camera gear.
Tripods: The Most Important Tool You’ll Ever Buy
If you only buy one tool, buy a tripod. Why?
Because most product photo quality issues come from:
- blur
- inconsistent angles
- shaky framing
- inconsistent distance from the product
A tripod fixes all of that.
And it also allows you to:
- shoot multiple angles consistently
- take clean, sharp close-ups
- create uniform product pages
You can use:
- a phone tripod (for smartphones)
- a camera tripod (for DSLRs and mirrorless)
Stability is the foundation of professional product photography.
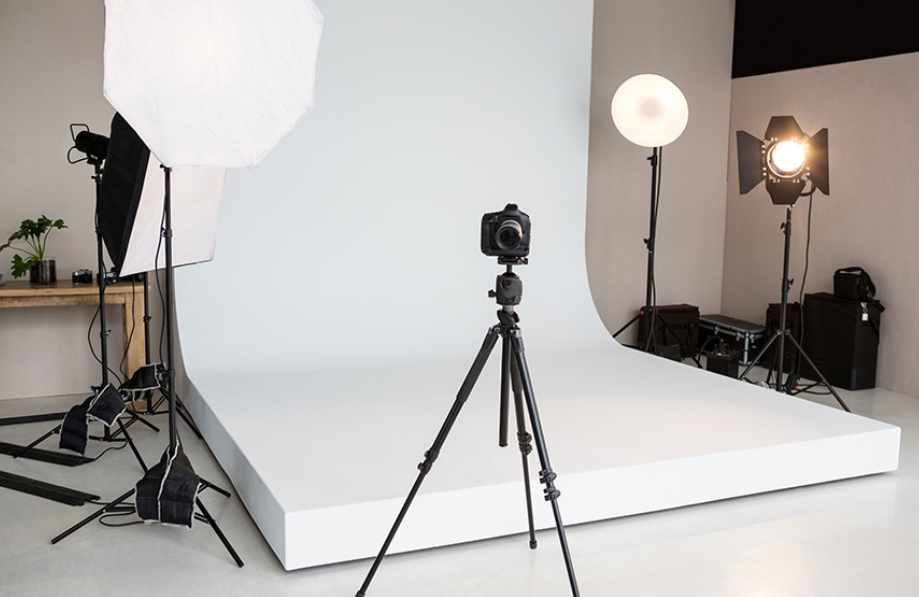
Lighting Tools for Product Photography Setup
Lighting is what makes product photography look expensive. Even with a high-end camera, bad lighting creates:
- harsh shadows
- uneven exposure
- dull colors
- inconsistent tone
In ecommerce, lighting should:
- highlight product texture
- make colors accurate
- reduce harsh shadows
- create consistency across images
Let’s look at the three best lighting setups in 2026.
Option 1: Natural window light (best for beginners)
Natural light is free and surprisingly professional when used correctly. Best practices:
- shoot near a large window
- place the product next to the window, not in direct sunlight
- use a white foam board to reflect light back into the product
- avoid overhead ceiling lights while shooting
Natural light works best for:
- skincare
- fashion
- lifestyle products
- handmade products
- matte surfaces
Option 2: Continuous softbox lighting (best for consistency)
If you want consistent lighting across multiple shoots, softbox lights are one of the best investments. They create a soft, controlled light source.
Best practices:
- use two softboxes for balanced lighting
- keep the light at a slight angle
- add a diffuser if needed
- shoot with the same setup every time for consistency
Softbox lighting is ideal for:
- ecommerce product pages
- catalogs
- consistent branding
- studio-style white background photos
Option 3: Ring light (best for small products and creators)
Ring lights are popular because they’re compact and affordable. They work best for:
- small products
- handheld photography
- beauty products
- creators doing quick shoots
But ring lights can create flat lighting, so they’re not always ideal for product texture. If you use a ring light:
- soften shadows with reflectors
- avoid shooting glossy items directly under it
Product Photography Setup: How to Build a DIY Studio at Home
A product photography setup doesn’t need a studio room. It needs three things:
- a clean background
- consistent lighting
- stable shooting
Let’s build a setup that works for most ecommerce products.
Step 1: Choose a shooting surface
Use a table or flat surface that:
- doesn’t shake
- gives you enough space for background sweep
- is near your light source
If you’re shooting larger products, use a floor setup.
Step 2: Create a seamless white background (the sweep method)
A “sweep” is a curved background that eliminates corners and shadows. You can create it with:
- white paper
- white poster board
- foam board
- fabric backdrop (not recommended unless ironed perfectly)
This setup makes products look like they were shot professionally.
Step 3: Position the product properly
Most people place the product randomly and start shooting. Instead:
- center the product
- keep it aligned
- use small support stands if needed
- shoot at consistent angles
- clean the product before every shot
Dust and fingerprints are invisible in real life but obvious in photography.
Step 4: Place your lighting
For the most basic product photography setup:
- light from one side
- use a reflector card on the opposite side
- adjust the angle until shadows look soft and natural
For a more professional setup:
- use two lights
- place one at 45 degrees to the product
- place the second on the other side or above
- keep lighting consistent across the product range
Step 5: Use a reflector (the easiest upgrade)
Reflectors are the cheat code for better product photos. Use:
- a white foam board (cheap and effective)
- a reflector sheet
- matte white poster board
This fills shadows and makes the product look clean and premium.
Must-Have Product Photography Shots for Ecommerce
A strong photoshoot for online products requires more than one nice image. It needs a complete story. Here are the essential shots ecommerce product pages should include:
1) Hero image (clean white background)
This is the main product image. It should be:
- clean
- centered
- well-lit
- clear
- accurate in color
This shot is critical for marketplaces and product page listings.
2) Multiple angles (minimum 4)
Customers want to understand the product quickly. Include:
- front view
- side view
- back view
- top view
- any unique feature angle
If you're selling apparel, include:
- front
- back
- close-up
- styling view
3) Close-up detail shots (especially for texture)
Close-ups build trust.
They show:
- fabric texture
- material finish
- stitching
- components
- product quality
Close-up photography is essential for premium products and high-ticket items.
4) Scale shot (show size clearly)
People often return products because of size misunderstandings. Scale shots reduce that. Use:
- a model
- a hand holding the product
- an everyday object near the product
- a product-in-use image
5) Lifestyle shot (context matters)
Lifestyle photos are what make customers imagine owning the product. These are crucial for:
- ads
- social content
- brand storytelling
- premium positioning
A clean lifestyle photo increases perceived value faster than any description.
Photography Techniques That Make Products Look Premium (Even With a Basic Setup)
Now that you have the tools and setup, let’s talk about techniques that actually improve quality.
Use consistent camera height and distance
Inconsistent framing makes product pages look messy. Pick one distance and stick with it. Use:
- marked tripod height
- fixed shooting space
- same background placement
Consistency is what makes a catalog look professional.
Shoot slightly above the product (not straight-on)
A slightly elevated angle looks more natural. Straight-on shots can feel flat. This is especially important for:
- bottles
- containers
- small objects
- boxed products
Use the “rule of thirds” for lifestyle images
For lifestyle shots, placing the product slightly off-center often looks better. It feels editorial and natural. But keep clean white background hero images centered.
Avoid harsh shadows
Harsh shadows scream “low-budget.” Fix this by:
- using diffused lighting
- shooting away from direct sunlight
- using reflectors
- using softboxes
Soft light = expensive-looking photography.
Use macro mode for close-ups (or a macro lens)
If you're shooting:
- jewelry
- fabric
- skincare packaging
- detail-heavy products
Use macro mode or a macro lens. This gives sharp detail and professional clarity.
Editing Product Photos in 2026: A Practical Workflow
Editing is where product photography goes from “good” to “professional.” But editing should enhance reality, not distort it. Here’s a clean editing workflow that works for ecommerce.
Step 1: Choose the best photo before editing
Don’t edit 20 images. Pick your strongest. Look for:
- sharpness
- correct exposure
- minimal reflections
- best product shape
- clean angles
Then edit only the best ones.
Step 2: Fix brightness and exposure
Adjust:
- highlights
- shadows
- exposure
- contrast
Your product should look balanced, not harsh.
Step 3: Correct color
Color accuracy is one of the most important parts of product photography. Bad color leads to:
- returns
- complaints
- low trust
- poor reviews
Always adjust:
- white balance
- saturation (carefully)
- tone consistency
Step 4: Clean the product
Remove:
- dust
- scratches
- fingerprints
- unwanted marks
This is where many product photos become premium.
Step 5: Background cleanup or removal
For ecommerce, background should be:
- clean
- consistent
- distraction-free
You can:
- clean up background manually
- remove background
- replace it with clean white
- create brand-colored backgrounds
This is where Smartli can become a strong advantage for ecommerce brands in 2026.
How Smartli Fits Into Product Photography in 2026
Product photography isn’t just about taking photos anymore. It’s also about:
- editing faster
- creating product page content
- optimizing visuals for online selling
- keeping branding consistent across product catalogs
This is where Smartli becomes useful in a modern product photography workflow.

With Smartli, you can:
- remove backgrounds quickly
- create clean product-ready images without complex editing
- enhance visuals for consistent ecommerce branding
- generate high-quality product descriptions that match your photos
- speed up your catalog creation workflow
Instead of spending hours editing and writing content separately, you can streamline both visuals and product page content in one smooth workflow. For ecommerce brands scaling product uploads, Smartli helps bridge the gap between photography and selling.
How to Optimize Product Photos for Ecommerce Platforms
Even great photos can perform poorly if they aren’t optimized. Here’s how to fix that.
Use the right dimensions
Different platforms require different image sizes. But general best practice:
- use high resolution for clarity
- compress for speed
- keep consistent aspect ratios across product images
Compress images for fast loading
Slow loading images kill conversions. Always compress images without losing visible quality.
Name files properly
Instead of: IMG_3489.jpg
Use: product-name-color-angle.jpg
This improves SEO and organization.
Add descriptive alt text
Alt text helps:
- accessibility
- Google image ranking
- product page SEO
Include keyword naturally, such as: “product photography setup for handmade leather wallet”
Maintain consistent style
Your store should have:
- consistent lighting
- same background style
- similar crop/spacing
- consistent sharpness
Consistency makes your brand feel premium.
Photoshoot for Online Products: A Repeatable Workflow That Saves Time
If you want your product photography to scale, you need a system. Here is a repeatable workflow you can use for every shoot:
Pre-shoot checklist
- clean product
- prep props (if lifestyle shots)
- set camera settings
- prepare background
- test lighting
- check angles
Shoot checklist
- hero shot
- 4 angles
- close-ups
- scale shot
- lifestyle shot (if relevant)
Post-shoot checklist
- select best images
- edit exposure
- correct colors
- clean product imperfections
- background cleanup
- optimize file size
- upload and add alt text
- write product descriptions
This system keeps your product photography efficient and professional.
Product Photography Trends in 2026 (What’s Working Right Now)
To stay competitive, it helps to know what customers respond to. Here are trends shaping product photography in 2026:
More context, less “perfect”
Customers trust realistic shots more than overly polished ones. Lifestyle images that feel authentic are winning.
Close-ups are now expected
More brands are including:
- texture zoom images
- material close-ups
- craftsmanship detail shots
This boosts trust and reduces returns.
AI-assisted editing is becoming standard
Brands are using AI for:
- background removal
- lighting correction
- creating consistent catalog-style images
- generating variants for ads
But realism still matters. The best brands use AI to enhance — not to fake.
Short-form video + photo hybrids
Brands are shooting product images in a way that also works for:
- reels
- TikTok product videos
- animated listings
- quick ad creatives
So the product shoot is now multi-purpose.
Conclusion
Product photography in 2026 is no longer about having a studio or expensive equipment—it’s about building a system that consistently produces high-quality visuals that sell. When your product photos are clean, well-lit, and detailed, customers feel confident buying online, and your brand instantly looks more professional. A strong product photography setup, paired with the right angles, close-ups, and lifestyle shots, helps you communicate product value in seconds—often faster than any written description can.
What truly separates high-performing ecommerce brands today is how efficiently they create and scale visuals. The winning approach is simple: keep your lighting consistent, follow a repeatable shot checklist, and refine your editing workflow so every image looks intentional and on-brand. And as AI becomes a bigger part of ecommerce operations, tools like Smartli make the process faster by helping you clean up backgrounds, enhance visuals for consistency, and generate product content that matches your images—so you can launch more products with less effort. Ultimately, great product photography isn’t just a design choice—it’s a growth lever that improves trust, reduces returns, and increases conversions across every sales channel.
Top Product Photography FAQs for 2026
What is the best product photography setup for beginners in 2026?
A simple DIY setup works best for beginners. Use a stable table, a clean white background (paper sweep), natural window light or a basic softbox, and a tripod. This combination gives you clean lighting, sharp photos, and consistent results without needing a studio.
Is a smartphone good enough for product photography in 2026?
Yes, a smartphone is more than enough if you use proper lighting and keep the camera stable. Modern phone cameras produce high-quality results, especially for ecommerce. The biggest improvement usually comes from better lighting and a consistent setup—not from upgrading the camera.
How do I make product photos look professional without a studio?
Professional-looking product photos come from consistency and clean lighting. Use soft diffused light, avoid harsh shadows, shoot against a clean background, and capture multiple angles. Editing for correct exposure, accurate color, and background cleanup also makes a huge difference.
What shots should every ecommerce product page include?
Every product page should include a clean hero image, multiple angles, close-up detail shots, a size or scale shot, and at least one lifestyle image showing the product in use. These images reduce hesitation, build trust, and improve conversions because customers can clearly understand the product.
How does Smartli help with product photography in 2026?
Smartli helps streamline post-production by making it easier to remove backgrounds, clean up visuals, and keep product images consistent across a catalog. It also supports faster listing creation by generating product descriptions that match the visuals, helping ecommerce brands launch products quicker and more efficiently.


.avif)