Image editing used to feel complicated, especially for beginners. You needed to understand layers, masking, lighting adjustments, and multiple editing tools just to make a photo look better. For many people, this created a steep learning curve that made editing feel overwhelming.
AI has changed that.
Today, you can remove backgrounds, enhance image quality, retouch portraits, and even generate new elements in just a few clicks. Instead of manually adjusting every detail, AI tools analyze your image and apply improvements automatically.
But here’s the important part.
AI doesn’t eliminate the need for judgment—it simplifies the process. The best results come when you understand what to automate and what to refine manually.
This guide will walk you through everything you need to know about AI image editing for beginners, including how it works, what you can do with it, and how to get the best results step by step.
What Is AI Image Editing?
AI image editing refers to using artificial intelligence to automatically analyze and modify images. Instead of relying only on manual adjustments, AI tools can detect objects, faces, lighting conditions, and backgrounds to apply edits intelligently.
How It Works
AI tools use machine learning and computer vision to understand the content of an image. This allows them to:
- Identify objects and subjects
- Separate backgrounds from foregrounds
- Detect lighting and color imbalances
- Recognize faces and skin tones
Once the image is analyzed, the tool applies adjustments based on patterns it has learned from thousands of examples.
Why It Feels Different from Traditional Editing
Traditional editing requires you to manually select areas, adjust sliders, and fine-tune settings. AI, on the other hand, handles much of that process automatically. This makes editing:
- Faster
- More accessible
- Less technical
For beginners, this removes one of the biggest barriers to getting started.
Why AI Image Editing Is Ideal for Beginners
Getting started with image editing can feel intimidating when you’re faced with complex tools, technical settings, and unfamiliar editing terms. That’s what makes AI image editing so useful for beginners. Instead of forcing you to learn every manual technique from day one, AI helps simplify the process and makes professional-looking edits more approachable.
It lowers the barrier to entry, shortens the learning curve, and gives you the confidence to improve images without needing years of editing experience.
Reduces Technical Complexity
One of the biggest reasons beginners struggle with traditional editing is the technical knowledge required to make even simple changes. Tasks like masking a subject, adjusting lighting selectively, or removing unwanted objects usually involve multiple tools and a clear understanding of how editing software works. For someone just starting out, that can feel overwhelming.
AI removes much of that complexity by automating these difficult steps in the background. Instead of manually selecting edges or working with layers, you can often choose an edit with a click and let the tool handle the heavy lifting. This makes image editing feel far less intimidating and allows beginners to focus on what they want to achieve rather than how to execute every small technical step.
Speeds Up Editing
Traditional photo editing can be time-consuming, especially when you’re learning as you go. Even a simple task like cleaning up a background or improving brightness might take much longer if you’re still trying to understand the tools. This slows down the process and can make editing feel frustrating instead of enjoyable.
AI speeds things up by handling repetitive and time-intensive tasks almost instantly. What might have taken an hour manually can often be done in a few minutes, which makes editing more rewarding for beginners. Faster results also create more room for experimentation, helping users try different styles, adjustments, and creative ideas without feeling stuck in a long and complicated workflow.
Improves Accuracy
Precision is one of the hardest parts of image editing for beginners. Making clean selections, removing objects naturally, or adjusting only the right part of an image usually takes practice. Without experience, it’s easy to end up with rough edges, unnatural blending, or edits that look obviously manipulated.
AI improves this by recognizing subjects, backgrounds, faces, and fine details more intelligently than a beginner could do manually. It can often detect image elements with greater precision, which leads to cleaner cuts, smoother retouching, and more polished results. While it’s still important to review the output, AI gives beginners a much stronger starting point and reduces the chances of obvious editing mistakes.
Encourages Creativity
When too much energy goes into figuring out technical tools, there’s very little left for creativity. Beginners often spend more time worrying about how to make an edit than thinking about the visual outcome they actually want. This can make the whole process feel restrictive rather than inspiring.
AI changes that by taking care of much of the mechanical side of editing. Once the difficult parts are simplified, beginners can focus more on experimenting with styles, improving composition, trying different backgrounds, or enhancing the mood of an image. That shift makes editing feel more creative and enjoyable, which is often what helps new users build confidence and keep learning.
Common Types of AI Image Edits Beginners Can Start With
AI image editing offers a wide range of features, but not all of them are necessary when you’re just getting started. The best approach for beginners is to focus on simple, high-impact edits that are easy to apply and deliver visible improvements.
These common editing types help you understand how AI works while building confidence step by step. Once you’re comfortable with these basics, you can gradually explore more advanced features and creative edits.
1. Background Removal
Background removal is one of the most popular AI features.
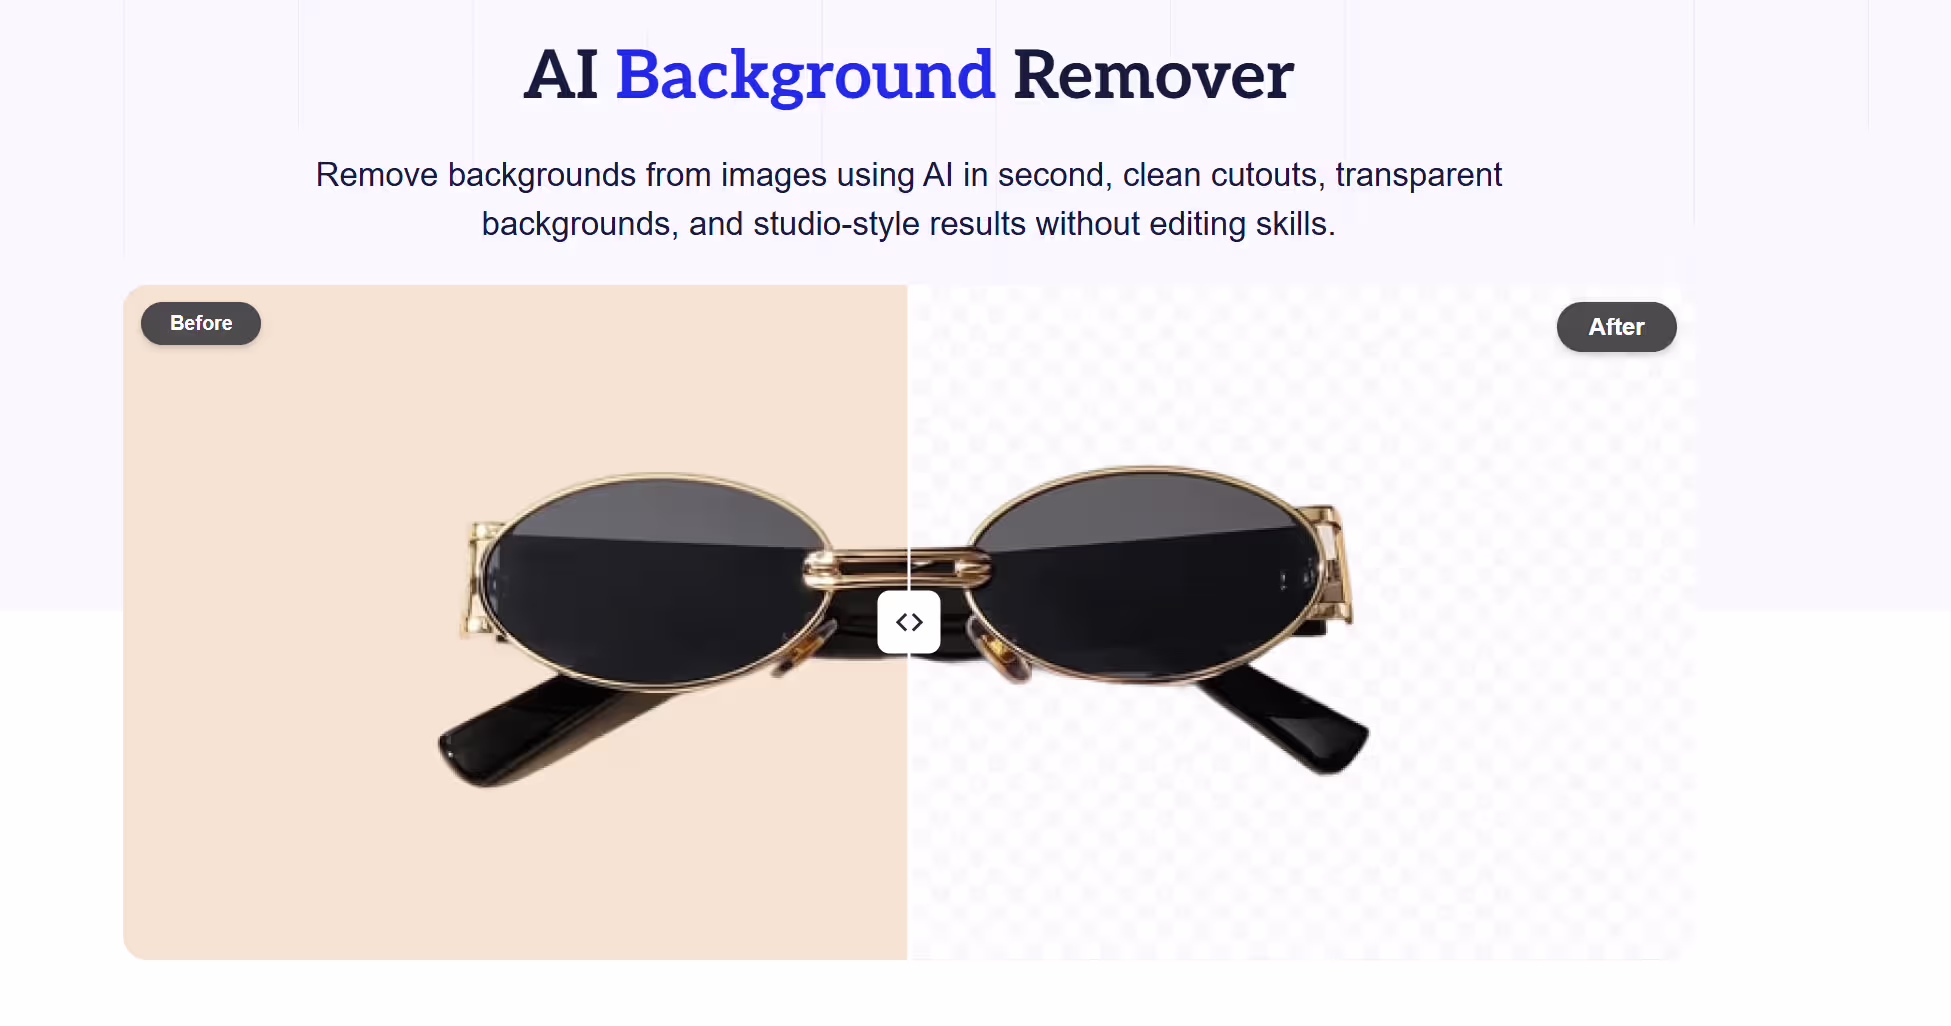
AI tools can automatically separate the subject from the background, allowing you to:
- Replace backgrounds
- Create clean product images
- Improve visual focus
This is especially useful for ecommerce and social media content.
2. Object Removal
AI can remove unwanted objects from images.
Whether it’s a person in the background or an unwanted item, the tool fills in the space naturally. This helps clean up images without requiring manual editing skills.
3. Brightness and Color Correction
AI tools can automatically adjust:
- Exposure
- Contrast
- White balance
- Color tones
This ensures your image looks balanced and visually appealing without needing manual adjustments.
4. Portrait Retouching
For photos with people, AI can enhance:
- Skin tone
- Lighting
- Facial details
It can smooth skin and adjust lighting while maintaining a natural look.
5. Image Upscaling and Sharpening
AI can improve image resolution and clarity.
This is useful for:
- Enhancing low-quality images
- Preparing visuals for professional use
- Improving product photos
6. Inpainting and Outpainting
Inpainting allows you to fill in missing parts of an image, while outpainting extends the image beyond its original boundaries.
These features are useful for:
- Creative edits
- Expanding backgrounds
- Fixing damaged images
How to Start Editing Images with AI Step by Step
AI image editing becomes much easier when you follow a simple process instead of jumping into random features. For beginners, having a step-by-step workflow helps remove confusion and makes it easier to understand what each edit is doing.
From choosing the right tool to refining the final result, each step plays a role in improving both quality and confidence. In this section, we’ll walk through a clear beginner-friendly process you can follow to edit images more effectively with AI.
Step 1: Choose the Right AI Tool
Start by selecting a tool that matches your needs.
Some tools focus on:
- Quick edits
- Advanced features
- Specific use cases like ecommerce
Choose one that is easy to use and fits your workflow.
Step 2: Upload a High-Quality Image
The quality of your input image affects the final result. Always use:
- High-resolution images
- Clear subjects
- Good lighting
Better input leads to better output.
Step 3: Select the Type of Edit
Decide what you want to achieve. This could include:
- Removing the background
- Enhancing colors
- Retouching a portrait
Focusing on one edit at a time helps maintain quality.
Step 4: Apply AI Adjustments
Let the AI tool process your image. Most tools provide:
- One-click enhancements
- Adjustable settings
- Preview options
Take advantage of these features to fine-tune results.
Step 5: Refine the Output
AI is powerful, but not perfect. Check for:
- Artifacts
- Blurred areas
- Unnatural edges
Make small adjustments to improve the final image.
Step 6: Export in the Right Format
Choose the correct format based on your use case:
- JPEG for general use
- PNG for transparent backgrounds
- High-resolution formats for professional use
Best Tips for Better Results with AI Image Editing
AI tools can produce impressive results quickly, but getting consistently high-quality output depends on how you use them. Small adjustments in your approach—like choosing better images or applying edits more thoughtfully—can make a noticeable difference in the final result.
By following a few practical tips, beginners can avoid common issues and make their edits look more natural, polished, and professional.
- Start with High-Quality Images: Low-quality inputs limit what AI can achieve.
- Avoid Over-Editing: Too many adjustments can make images look unnatural.
- Focus on One Change at a Time: Applying multiple edits simultaneously can reduce clarity.
- Review Details Carefully: Check edges, shadows, and textures for inconsistencies.
- Use AI as a Starting Point: Think of AI as a first step, not the final result.
Common Mistakes Beginners Make
While AI image editing makes things easier, it’s still possible to get poor results if you rely on it without understanding how it works. Many beginners expect perfect outputs with a single click or apply too many edits at once, which can make images look unnatural.
These mistakes often come from over-reliance on automation or skipping basic checks. By being aware of these common pitfalls, you can use AI more effectively and create cleaner, more professional-looking images.
- Expecting Perfect Results Instantly: AI improves images, but it may require refinement.
- Using Low-Quality Inputs: Poor input leads to poor output.
- Over-Reliance on Automation: Ignoring manual adjustments can reduce quality.
- Ignoring Details: Small errors can impact the overall result.
AI Image Editing vs Traditional Editing
Both methods have their place.
AI Editing
- Faster
- Easier
- Beginner-friendly
Traditional Editing
- More control
- Better for complex edits
- Requires skill
The best approach is often a combination of both. Once your images are edited, the next step is turning them into content that performs.
This is where Smartli becomes useful. After creating high-quality visuals, you still need:
- Product descriptions
- Blog content
- SEO-optimized copy
- Social media captions
Smartli helps you generate this content quickly and consistently, ensuring your visuals are supported by strong, engaging text.
This creates a complete workflow—from visual creation to content distribution.
Future of AI Image Editing
AI image editing is evolving rapidly. We can expect:
- More accurate edits
- Better realism
- Faster processing
- Advanced creative tools
As tools improve, the gap between beginners and professionals will continue to shrink.
Final Thoughts
AI image editing has made photo editing more accessible than ever. You no longer need advanced skills to create high-quality visuals. With the right tools and approach, beginners can achieve professional-looking results in a fraction of the time.
The key is to use AI as a tool, not a shortcut. Focus on quality inputs, make thoughtful adjustments, and refine your results.
And once your visuals are ready, tools like Smartli can help you turn them into content that drives engagement and results.
FAQs About AI Image Editing for Beginners
What is AI image editing?
AI image editing is the process of using artificial intelligence to analyze a photo and apply edits automatically. Instead of manually adjusting every detail, the tool detects elements like subjects, backgrounds, lighting, and objects for you. This makes common edits faster, easier, and more accessible, especially for people with little or no editing experience.
Is AI image editing easy for beginners?
Yes, AI image editing is generally very beginner-friendly because it removes much of the technical complexity found in traditional editing software. Many tools are built with simple interfaces and one-click features that make basic edits easy to apply. This allows beginners to improve images quickly without needing to understand advanced techniques from the start.
What can AI edit in a photo?
AI can handle a wide variety of edits depending on the tool you use. Common examples include background removal, object removal, brightness and color correction, portrait retouching, sharpening, and image upscaling. Some advanced tools can also add, replace, or extend parts of an image for more creative results.
Do AI image editors replace manual editing?
Not completely, because AI works best as a helper rather than a full replacement for human judgment. It can speed up editing and handle repetitive tasks very well, but some results still need manual refinement to look natural and accurate. For more detailed or creative work, traditional adjustments are often still important.
How do beginners get better results with AI image editing?
Beginners usually get the best results by starting with clear, high-quality images and focusing on one edit at a time. It also helps to review the output closely instead of assuming the AI result is perfect on the first try. A mix of simple AI edits and small manual refinements often leads to cleaner, more professional-looking images.


.avif)