Grain is a visual texture in photos that mimics the look of film, often used to add a vintage, artistic, or cinematic feel to an image. It's a form of digital noise that enhances depth, creating a more tactile and organic aesthetic, reminiscent of analog photography. Adding grain to a photo can elevate the mood, make it feel timeless, or evoke a specific style. With modern editing tools like Photoshop, Lightroom, and online platforms, adding grain has never been easier. These tools offer various methods to control the intensity, size, and style of grain, giving photographers and designers the creative freedom to experiment. In this guide, we'll explore the best techniques, popular tools, and helpful tips to seamlessly integrate grain into your photos for a professional, polished look.
What is Photo Grain and Why Use It?
Photo grain refers to the visual texture that resembles the appearance of film grain, often seen in analog photography. Originating from the chemical reaction between light and film emulsion, grain adds a random, textured effect to images. While digital photography has largely eliminated this effect, modern editing tools allow photographers and editors to recreate it for artistic purposes.
Grain vs. Digital Noise
It's important to differentiate between grain and digital noise. While grain is a purposeful texture added for artistic expression, digital noise is an unwanted artifact caused by low light conditions or high ISO settings. Digital noise often appears as random speckles, which can degrade image quality. Grain, on the other hand, is intentional and aesthetically pleasing, evoking a nostalgic, classic, or cinematic look.
Why Add Grain to a Photo?
Photographers add grain for several creative reasons:
- Mood and Atmosphere: Grain can transform the mood of a photo, lending it an old-school, moody, or even gritty feeling. It's often used to create vintage or retro looks, particularly in black-and-white photos.
- Depth and Texture: Grain adds a tactile quality that makes photos feel more organic and tactile. It can be used to enhance textures, giving the image more depth and dimension.
- Realism: Sometimes, grain is added to simulate real-world conditions, such as imperfections in a scene, to create a more lifelike effect.
- Artistic Intent: Whether for fashion, portraits, or street photography, grain is often used to add drama or an artistic flair, making the image stand out from clean, perfectly polished digital shots.
Methods: How to Add Grain to a Photo
There are several ways to add grain to a photo, depending on the tools you prefer. Here’s a breakdown of how you can achieve this effect using popular editing platforms.
Using Photoshop
Photoshop offers multiple methods for adding grain, giving you total control over the intensity and type of grain you want to apply.
Step‑by‑Step: Add Noise Filter
- Open Your Image: Start by opening your image in Photoshop.
- Add Noise Filter: Go to Filter > Noise > Add Noise. A dialog box will appear allowing you to adjust the Amount of noise. You can set the amount from 0 to 400% to adjust how noticeable the grain is.
- Adjust the Distribution: Choose between Uniform or Gaussian distribution. Gaussian offers smoother grain, while Uniform creates a more random effect.
Grain Adjustment Layer
Another method is to use a Grain Adjustment Layer for more fine-tuned control over the grain settings. This allows you to edit the grain without permanently affecting the image.
- Blending Modes: Use blending modes like Overlay or Screen to blend the grain smoothly into the image. This helps to adjust how the grain interacts with the underlying image.
- Smart Objects: Apply grain as a Smart Object so you can adjust it non-destructively anytime.
Subtle vs Strong Grain Effects
- Subtle Grain: Use this for portrait photos or when you want to add just a touch of texture.
- Strong Grain: This is ideal for vintage, cinematic looks or for photos where you want the grain to stand out.
Using Lightroom
Lightroom is another powerful tool for adding grain, especially for photographers who want quick results without diving too deep into Photoshop.
How to Use Lightroom’s Grain Panel
- Open the Photo: Import your image into Lightroom.
- Grain Panel: Navigate to the Effects panel and locate the Grain section.
- Adjust Amount: Slide the Amount slider to introduce grain. A value of 15-30 works well for most images, but you can go higher for a stronger effect.
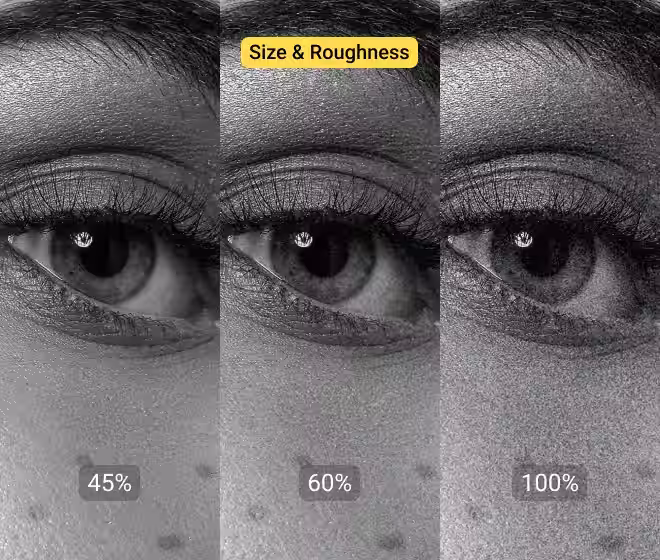
- Adjust Size & Roughness: The Size slider controls how large the grain particles are, while Roughness gives the grain a more textured appearance. Adjust these based on the type of effect you want.
Best Settings for Classic Film Looks
For a true classic film look, aim for:
- Amount: Around 25-40
- Size: Medium to small for smoother grain
- Roughness: Higher for a more pronounced, vintage feel
For portraits, reduce the size to keep the grain subtle and avoid overwhelming the subject.
Free & Online Tools
If you’re new to editing or prefer quick edits on mobile, online tools offer easy ways to add grain to your photos.
- Fotor: This free tool allows you to add a film grain effect in just a few clicks. You can adjust the grain intensity and size, making it perfect for quick edits.
- Pokecut: Another user-friendly tool for adding grain to your photos, with an option to customize the texture and intensity.
- CapCut: Known for video editing, CapCut also lets you add grain to your photos with preset effects that mimic film textures.
- VSCO: A mobile app popular for photo editing, VSCO provides grain filters that can be fine-tuned to create a vintage look, ideal for users on the go.
These tools are great for beginners who want an easy way to experiment with photo grain without the need for advanced software like Photoshop or Lightroom.
How to Add Grain to a Photo on iPhone & Android
If you’re editing on mobile, adding grain to a photo is surprisingly easy. Most modern apps come with built-in film grain filters or manual controls.
Using Popular Mobile Apps
VSCO (Best for aesthetic edits)
- Import your photo
- Select a preset (like A4, M5, or B1 for film looks)
- Tap Grain → adjust intensity (start with 2–4)
Snapseed (Free & beginner-friendly)
- Open Tools → Grainy Film
- Choose a preset and fine-tune Style Strength + Grain
- Great for quick vintage looks
Lightroom Mobile (Best for control)
- Go to Effects → Grain
- Adjust:
- Amount (intensity)
- Size (grain thickness)
- Roughness (texture feel)
Pro tip: For mobile screens, keep grain subtle. Heavy grain can look good while editing but appear too harsh when uploaded to Instagram.
Best Grain Settings for Different Photo Styles
There’s no “one-size-fits-all” grain setting. The right balance depends on the type of photo you’re editing.
Portrait Photography
- Amount: 10–25
- Size: Small
- Why: Keeps skin tones smooth while adding a soft film texture
Avoid heavy grain—it can make skin look rough or noisy.
Landscape Photography
- Amount: 20–40
- Size: Medium
- Why: Enhances textures like sky, mountains, and water
Works great for moody or cinematic edits.
Street Photography
- Amount: 30–50
- Size: Medium to large
- Why: Adds grit and realism—perfect for urban storytelling
Grain here actually improves the “raw” feel of the image.
Black & White Photos
- Amount: 25–45
- Roughness: High
- Why: Mimics classic film photography (like Kodak Tri-X)
This is where grain shines the most—don’t be afraid to push it.
How to Add Realistic Film Grain (Pro Tips)
Most beginners add grain — but realistic film grain is what separates amateur edits from professional ones.
Match Grain to ISO Look
In real film photography:
- Low ISO = fine grain
- High ISO = heavy, rough grain
If your photo is bright and clean, use subtle grain.
For dark, moody shots, increase grain intensity.
Avoid Banding and Over-Sharpening
- Adding grain on overly smooth gradients (like skies) can cause banding
- Over-sharpened images + grain = harsh, unnatural look
Fix:
- Reduce sharpness slightly before adding grain
- Add grain at the final stage of editing
Combine Grain with Depth & Blur
Grain looks more natural when paired with:
- Slight blur in the background
- Depth of field effects
- Light color grading
This mimics how real cameras capture texture across focus areas.
Use Grain Selectively (Advanced Tip)
Instead of applying grain everywhere:
- Add stronger grain to shadows
- Keep highlights cleaner
This creates a more cinematic and balanced look.
Creative Tips for Grain Editing
Adding grain to your photos can drastically change their mood and aesthetic. Here are a few creative tips to help you use grain effectively:
How to Adjust Grain for Backgrounds vs Portraits
Grain can be used differently depending on whether it’s applied to a background or a portrait subject. Here's how:
- Backgrounds: For background images, apply more intense grain to enhance texture and give the photo a deeper, more dynamic feel. A higher grain setting can help create a bokeh-like effect, where the background supports the main subject without drawing too much attention to itself.
- Portraits: When applying grain to portraits, keep the grain subtle and light. Overwhelming grain can distract from the subject and make the image feel harsh. Opt for smaller grain size and lower intensity to keep the focus on the person’s face while adding just enough texture to create a vintage or cinematic look.
Pairing Grain with Color Grading, Black & White Filter, or Vignette
Grain works beautifully in combination with other editing techniques, like color grading or black-and-white filters, to create a harmonious effect.
- Color Grading: When adding grain to color photos, use complementary color grading to match the grain style. For example, pairing cool tones with grain can give your photos a film noir feel, while warm tones paired with grain can create a nostalgic, retro look.
- Black & White Filter: Grain adds a classic touch to black-and-white images, mimicking the look of traditional film photography. The grain will enhance shadows and highlights, giving the image more depth and visual interest.
- Vignette: Adding a vignette (darkening the corners of your photo) along with grain can create a more dramatic effect. This combination draws the viewer’s attention to the center of the image while the grain adds an extra layer of texture and nostalgia.
Using Overlays, Textures, and Presets for Consistent Aesthetics
For a consistent and polished aesthetic, you can use overlays, textures, or presets that incorporate grain into your editing workflow:
- Overlays and Textures: If you want to add a specific kind of grain (e.g., dust, light leak, or noise), using texture overlays can help achieve the look you're after. Apply the texture over your image and adjust its opacity to blend the grain into the photo.
- Presets: Many editing platforms, like Lightroom and VSCO, offer presets that include grain and other film-inspired effects. Using these can help you maintain a consistent style across multiple photos, especially for projects or photo series.
When Not to Use Grain
While grain can add character and texture, there are certain situations where it might be best to leave it out.
When Clean Image Clarity is More Important
In some cases, sharp, clear images are essential, and grain may not be appropriate. These situations include:
- Product Photos: For e-commerce or product photography, clarity and detail are paramount. Adding grain could obscure fine details and reduce the sharpness of your product images, which is counterproductive when trying to showcase products in their best light.
- Real Estate Photography: When photographing real estate, it's important to showcase the property in the clearest, most professional manner. Grain can distract from the architectural details and make the photos appear less polished.
- Technical or Scientific Shots: In fields that require precise, accurate imaging (e.g., medical imaging, scientific documentation), grain can interfere with the clarity needed to analyze or interpret the photo.
Tips for Balancing Grain So It Enhances Rather Than Distracts
While grain can enhance the aesthetic of a photo, it can also be overdone. To ensure that grain enhances your photo instead of overpowering it:
- Control Grain Intensity: Apply grain subtly at first, and only increase the intensity if needed. Remember, less is often more when it comes to grain.
- Preview Your Edit: Zoom out and view the photo as a whole before finalizing your grain effect. Sometimes, what looks good up close can appear too harsh in the context of the entire image.
- Combine with Other Techniques: As mentioned earlier, combining grain with other effects like vignette or color grading can help balance the grain and ensure that it contributes to the overall feel of the photo, rather than distracting from it.
By using grain thoughtfully and with intention, you can enhance your photos with texture and mood while maintaining clarity when needed.
Conclusion
Adding grain to your photos is an excellent way to infuse them with texture, mood, and a timeless aesthetic. Whether you're using Photoshop, Lightroom, or free online tools, the key to perfecting the grain effect is balance and creativity. By adjusting grain based on the photo’s context—such as backgrounds, portraits, or black-and-white images—you can achieve stunning results that elevate your work.
If you're looking to streamline your photo editing process and achieve professional-quality results with ease, consider using Smartli. Our AI-powered tools are designed to make creative editing faster, smarter, and more efficient. From generating product descriptions to creating stunning photo edits, Smartli empowers you to elevate your content effortlessly.
Ready to take your photos to the next level? Try Smartli today and unlock your creative potential!
How to Add Grain to a Photo FAQs
What does it mean to add grain to a photo?
Adding grain to a photo means applying a film-like texture that mimics analog photography. It enhances mood, adds depth, and creates a vintage or cinematic look, making images feel more artistic and visually engaging.
How can I add grain in Photoshop?
You can add grain in Photoshop using the Add Noise filter, Camera Raw grain slider, or adjustment layers. These tools help control grain intensity, size, and distribution for achieving realistic film grain effects in photos.
What’s the difference between grain and digital noise?
Grain is an intentional texture added for a film-like, aesthetic look, while digital noise is unwanted distortion caused by low light or high ISO. Grain enhances visuals, whereas noise typically reduces image quality.
Are there free tools to add grain to photos online?
Yes, free tools like Fotor, CapCut, Pokecut, and VSCO allow you to add grain to photos online. These tools offer easy sliders and presets, making it simple to create vintage or cinematic grain effects quickly.
How much grain should I add to a photo?
The amount of grain depends on your style. Use subtle grain (10–30%) for a natural film look, or increase intensity for dramatic effects. Always preview your image to ensure the grain enhances, not overpowers, the photo.