Faded memories deserve a second life. Whether you're digging through a box of family photographs or inherited albums, old photos often show the scars of time. Creases, scratches, water stains, and fading can dim the beauty of your most cherished images. The good news? You don't need expensive professional services anymore. Modern photo restoration has become accessible to everyone.
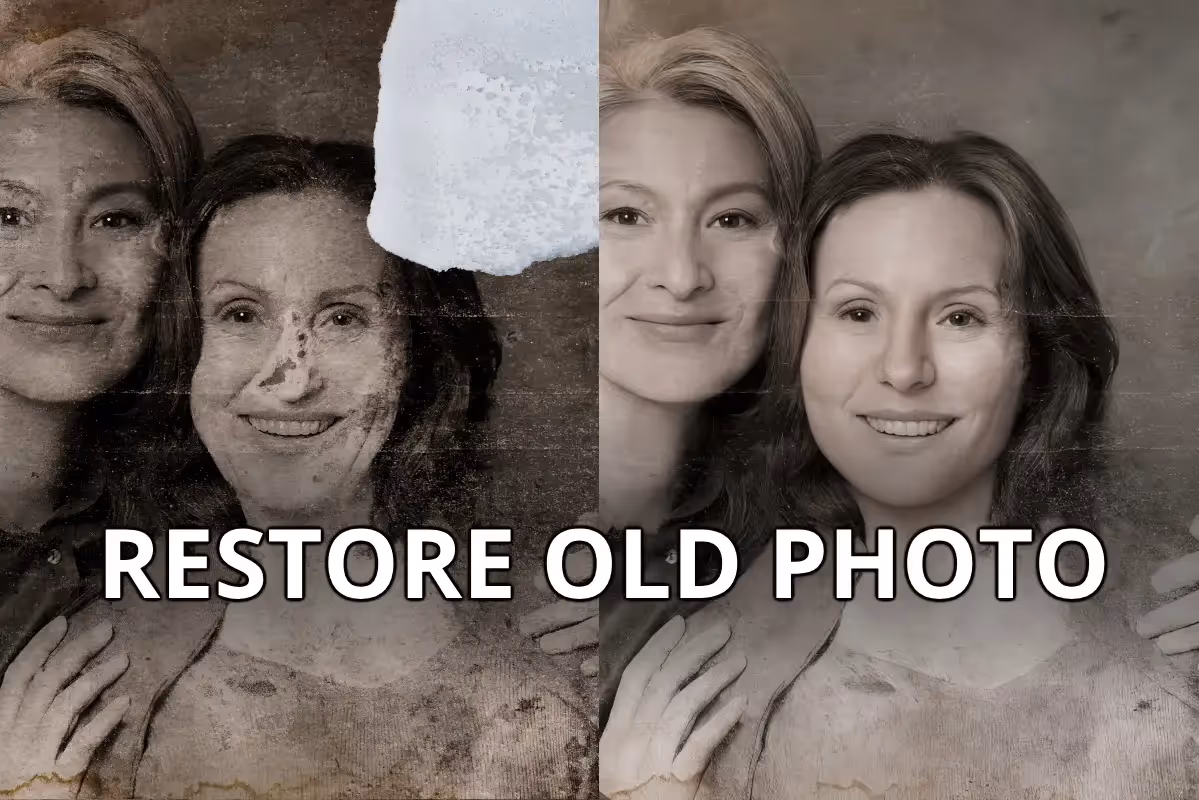
With the right tools and techniques, you can learn how to restore old photos in your home, reviving memories that might otherwise stay buried in a drawer. This guide walks you through practical methods to bring those precious moments back to life.
How Do Photos Get Damaged?
Old photographs face multiple threats. Sun exposure bleaches colors and creates fading, especially around the edges. Physical damage like tears, creases, and scratches accumulate from handling and storage. Stains from spills, moisture, or age spots appear on surfaces. Some photos develop mold or discoloration from humidity and temperature swings. Black and white photos may have fading that makes them hard to see. Understanding what damage your photo has suffered helps you pick the right restoration method.
Common Types of Damage
Physical damage includes rips, creases, and scratches from handling. Environmental damage comes from sun exposure, heat, humidity, and water. Chemical damage happens when the photo emulsion breaks down over time. Dust and debris settle on surfaces. Color casts develop from improper storage or aging. Blur happens when the original photo wasn't sharp to begin with. Each type needs different attention when you work on restoration.
Preparing Your Photo for Restoration
Before you start the repair process, proper preparation is crucial. If you have the physical photo, handle it with clean, dry hands. Avoid touching the front surface as oils and moisture damage old prints. Gently dust the back with a soft, dry cloth. Use a soft-bristled brush on the front if needed, brushing away from the center outward. Never use water, cleaners, or commercial products on original prints.
The next step is to scan the photo. Use a scanner with at least 300 DPI resolution. Higher resolution (600 DPI) captures more detail, which helps during restoration. Save the scan in a lossless format like TIFF or PNG rather than JPG. This preserves quality during editing. Store the original scan file safely as your master copy. If you don't have access to a quality scanner, many photo shops and libraries offer scanning services.
Different Ways on How to Restore Old Photos
Here ar various methods you can try. They all work well and help you restore old photos to bring them back to life:
1. AI-Powered Restoration Tools
The easiest way to learn how to restore old photos is using artificial intelligence. These tools automate much of the work, making restoration simple for beginners. AI photo restoration uses machine learning to analyze damage and fix it automatically. The software recognizes scratches, tears, color shifts, and missing details, then repairs them intelligently.
Why Choose AI Tools
AI tools work fast. You can restore a photo in seconds or minutes rather than hours. No special skills needed—just upload and let the software do the work. Many offer free versions to try. Results look natural because AI learns from millions of edited photos. You can often adjust the intensity of restoration to match your preference. Batch processing lets you restore dozens of photos at once.
Using AI Photo Restoration Step-by-Step
Start by uploading your scanned photo to an AI restoration tool. The software analyzes the image and shows a preview of changes. If you like the preview, apply the restoration. Many tools let you adjust sliders to control how much enhancement happens. Download the restored image once done. Save it with a new filename so you keep your original intact.
Popular AI tools include Remini, which specializes in facial detail and clarity, and Recraft, which offers upscaling and background removal. Fotor provides free photo enhancement with AI tools built in. Each tool has slightly different strengths, so you might test multiple ones on the same photo to see which gives the best result for your specific image.
2. Photoshop and Professional Software
If you want absolute control over restoration, Adobe Photoshop is the industry standard. You can repair damage manually using specialized tools. This method takes longer and has a steeper learning curve, but gives you precise control over every edit.
Photoshop's Neural Filters for Restoration
Photoshop includes AI-powered neural filters that automate some restoration tasks. The Photo Restoration filter removes scratches and dust. The Colorize filter adds realistic color to black and white photos. You apply these filters and adjust their intensity to taste. This hybrid approach blends automation with professional software.
Manual Tools for Detailed Work
For precise repairs, use Photoshop's manual tools:
- Clone Stamp Tool: Samples pixels from a clean area and paints them over damage. Works well for scratches, stains, and small tears. Hold Alt (Option on Mac) and click to set your source, then paint over damage.
- Healing Brush: Similar to Clone Stamp but blends edges automatically for a natural look. Better for small imperfections and creases.
- Spot Healing Brush: Works automatically on small blemishes. Just click or drag over the problem area.
- Patch Tool: Select a damaged area, then drag the selection to a clean area with matching texture. Photoshop blends them seamlessly.
For larger tears, combine tools. Use Patch Tool for the main repair, then Healing Brush to refine edges. Zoom in to 200% or more for precision work. Take your time with overlapping strokes to avoid visible seams.
3. Online Photo Editing Platforms
Web-based editors let you restore photos without installing software. Fotor stands out for combining user-friendly controls with professional results. You get batch editing, AI enhancement, and manual tools all in one place. No signup required to start. You can edit directly in your browser on any device.
Fotor's AI Photo Enhancer automatically improves clarity and color. Its background removal tool can help eliminate stains or unwanted elements. Manual adjustment sliders let you fix brightness, contrast, saturation, and sharpness.
How to Restore Old Photos: A Step-by-Step Guide
Here's a practical workflow whether you choose AI or manual methods:
Step 1: Scan and Save - Scan your photo at 300+ DPI in TIFF or PNG format. Store the original scan safely. Create a working copy for editing.
Step 2: Assess the Damage - Look at your photo and identify issues. Note fading, scratches, stains, tears, blur, and color problems. Prioritize what bothers you most.
Step 3: Choose Your Tool - Pick an AI tool for quick results or Photoshop for detailed control. If you're new to restoration, start with AI.
Step 4: Apply Initial Corrections - Use AI enhancement or neural filters to handle overall issues like fading and contrast. Let the software work first before manual adjustments.
Step 5: Address Specific Damage - For scratches, stains, and tears, use specialized tools. Zoom in close and work methodically. Small, overlapping strokes blend better than single wide strokes.
Step 6: Color Correction - Adjust color balance if the photo has color casts. Boost saturation carefully—too much makes colors look fake. Keep adjustments subtle.
Step 7: Sharpen and Enhance - Use sharpening filters to bring back detail. Use a moderate setting to avoid making the image look grainy. Enhance facial features if the photo includes people.
Step 8: Final Review - View your restored photo at 100% zoom. Check problem areas closely. Make additional adjustments as needed. Compare before and after to make sure changes look natural.
Step 9: Save Your Work Save the restored version with a new filename. Keep both the original and restored versions. Export as TIFF for archival or JPG for sharing.
Free vs. Paid Tools for Photo Restoration
Your budget shapes which tools you use. Free AI tools let you try restoration without spending money. They often have daily limits or watermarks. Paid versions remove these restrictions and add features.
AI tools usually work on a credit system. You get a certain number of free restorations per month or per day. Additional restorations cost small amounts, typically 1–5 each. Some subscription plans offer unlimited use for 5–15 monthly.
Photoshop requires an Adobe Creative Cloud subscription ($55/month). This works if you edit photos regularly. If you restore photos occasionally, free or low-cost AI tools make more sense.
Some online platforms like Fotor offer forever-free plans with limits on features, or premium plans ($100/year) for advanced tools and batch processing. Test free versions before committing to paid plans.
Tips for Better Photo Restoration Results
- Work with the highest resolution scan you can get. 600 DPI beats 300 DPI when it comes to capturing detail. Use lossless file formats during editing.
- Save as JPG only at the very end. Take breaks while editing. Fatigue makes you miss imperfections or over-edit. Compare your work to the original frequently. What looks perfect at 400% zoom might look wrong at normal size.
- When using manual tools, use a tablet with a stylus for finer control than a mouse. If you make mistakes, undo and try again. Non-destructive editing preserves your original scan. Never edit the original file.
- Organize your photo files by project or family. Name them clearly so you remember which is the original and which is restored. Back up your files to cloud storage or external drives. Old photos are irreplaceable.
When to Hire Professional Restoration Services?
AI tools handle most damage well. But some situations benefit from professional help. If your photo has large tears with missing pieces, professionals can reconstruct missing areas better than AI. If the photo has severe water damage or mold, professionals have specialized equipment and experience. For photos with historical or sentimental value, professional restoration ensures the best possible outcome. Professionals cost 50–500 per photo depending on damage severity. If you have a handful of irreplaceable family photos, this investment is worth considering.
Tools Mentioned in This Guide
Remini specializes in facial enhancement and detail restoration. Recraft offers upscaling and advanced editing tools. Fotor provides free AI-powered restoration in a browser. Adobe Photoshop offers professional-grade neural filters and manual tools. If you use content creation platforms, Smartli provides AI tools for image enhancement alongside content generation features.
Conclusion
How to restore old photos is a skill anyone can learn. You don't need to be a photographer or designer. Start with a free AI tool to see what's possible. If you want more control, explore Photoshop or online editors. The key is starting now before memories fade further. Your old photographs hold stories worth preserving. With the right approach, you can bring those moments back to life for yourself and future generations to enjoy. Try Smartli to retouch your photos today.
How to Restore Old Photos: FAQs
What file format should I use when scanning old photos?
Use TIFF or PNG formats when scanning and editing. These lossless formats preserve all image information without compression. JPG compresses data and loses detail with each save, making it unsuitable for restoration work. Save your final restored image as JPG only when sharing, but keep a TIFF backup for future edits.
Can AI tools really remove major tears and damage?
AI tools work best on minor to moderate damage like scratches, fading, and stains. Large tears with missing pieces are harder to restore convincingly. If pieces are missing, AI has to guess what was there. Professional manual restoration handles complex damage better because humans understand context and can inpaint realistically based on surrounding areas.
How do I avoid over-editing and making photos look fake?
Use the lightest touch that fixes the problem. Start with low adjustment values and increase gradually. Zoom out frequently to see the full image. Compare your edit to the original side-by-side. Remember that original photos usually aren't perfect—slight imperfections add authenticity and character that excessive editing removes.
Is it safe to use cloud-based photo restoration tools with family photos?
Most reputable tools delete uploaded images within 24 hours. Check privacy policies before uploading. For highly sensitive family photos, work offline with Photoshop or local software. For routine restorations, established tools like Remini and Fotor have strong privacy practices and handle millions of photos safely.
What resolution do old photos need for restoration to work well?
Scan at minimum 300 DPI for standard restoration. For detailed work or large prints, use 600 DPI. Higher resolution captures more information, giving AI and manual tools more to work with. If your original scan is low quality, the restored version can only be as good as the source material—garbage in, garbage out.
How long does it take to restore a batch of old photos?
AI batch processing handles 10–50 photos in minutes depending on file sizes and tool capabilities. Manual restoration in Photoshop takes 30 minutes to several hours per photo depending on damage severity. Simple AI restoration takes seconds per photo. Plan accordingly based on your project size and deadline.


.avif)