Plant photography is all about capturing the natural beauty of your houseplants, indoor gardens, and potted greens in their best light. Whether you’re using a smartphone or a DSLR, the right composition and lighting can bring your plants to life—but the real magic happens during editing. Post-processing helps enhance colors, sharpen details, and create that professional touch every plant photo deserves. In this guide, you’ll learn simple yet powerful editing tricks to elevate your plant photography at home—along with practical setup tips and quick capture techniques for picture-perfect results. From balancing brightness to highlighting textures, these insights will help you transform everyday plant shots into stunning visuals that showcase your love for greenery and elevate your indoor photography skills effortlessly.
Why Editing Matters in Plant Photography
When it comes to plant photography, lighting and composition form the foundation of a great shot. Capturing plants during the early morning or late afternoon—when the light is soft and diffused—creates the most natural tones. Good composition, such as using the rule of thirds or focusing on the plant’s most striking features, helps the viewer connect with your image instantly.
However, even with perfect lighting, your photo often needs a little post-processing magic to truly stand out.
How Editing Transforms Your Plant Photos
- Correct Exposure: Adjust brightness and contrast to bring out realistic greens and leaf details.
- Boost Texture: Sharpen edges to highlight veins, petals, and fine details often missed by the camera.
- Clean Background: Remove distractions and clutter for a professional, minimalist look.
- Enhance Colors: Subtle color correction makes your plants appear vivid without looking artificial.
Why It’s Essential for Indoor Plant Photography
Shooting plants at home often means limited space, uneven lighting, and busy backgrounds. That’s why editing becomes crucial—it compensates for these constraints, balances tones, and enhances textures to make every leaf shine. Whether you’re photographing a cozy corner of succulents or a large monstera by the window, editing ensures your indoor plant photography looks fresh, vibrant, and magazine-worthy.
By refining your images thoughtfully, you turn simple snapshots into visually captivating plant portraits that highlight your love for greenery and attention to detail.
Pre-Edit Checklist: Set Up Before You Shoot
Before diving into editing, the key to great plant photography is getting the shot right from the start. A well-prepared setup ensures you spend less time correcting mistakes later and more time enhancing the beauty of your plants. Follow this pre-edit checklist to make your photos naturally stunning.
1. Clean & Prepare Your Plant Subject
A clean, healthy plant instantly looks more photogenic. Wipe the leaves gently to remove dust or water stains and trim any yellow or dried foliage. This helps the camera capture every leaf’s natural shine and texture. Healthy plants with glossy leaves make for sharper, more detailed images and require minimal retouching later.
2. Choose the Right Light and Background
Light can make or break your indoor plant photography. Natural diffused light works best. Position your plants near a bright window or shoot during the golden hour—early morning or late afternoon—for warm, soft tones. Avoid harsh sunlight or cluttered backgrounds; instead, use neutral backdrops like plain walls or textured wood to make your greens pop beautifully.
3. Get the Right Camera Settings or Device Setup
You don’t need fancy gear to master plant photography at home. Modern smartphones can capture impressive detail if you focus correctly and adjust exposure manually. For DSLR or mirrorless users, set a wide aperture (f/2.8–f/5.6) to blur backgrounds, keep ISO low (100–400) to reduce noise, and adjust shutter speed to match lighting conditions. Experiment with manual focus for macro shots of leaf veins or blooms.
4. Composition & Angle Matters
Creative angles make your plant photos stand out. Try experimenting with:
- Overhead shots to showcase arrangements or symmetry.
- Side-views for depth and layering.
- Close-ups for textures and fine details.
- Rule of Thirds & Negative Space to balance your subject beautifully.
Changing your perspective adds personality to your photos and helps highlight the plant’s most unique features—transforming your plant photography into true art.
Editing Tricks for Stunning Plant Photography
Editing is where your plant photography truly comes to life. The right post-processing techniques can transform a simple snapshot into a vibrant, professional-looking image that highlights every leaf, petal, and texture. Below are five actionable editing tricks to elevate your plant photos and make them stand out beautifully on social media or your portfolio.
Trick 1: Correct Exposure & Balance Colors
Exposure and color balance are the backbone of clean, professional plant photography. Start by adjusting the exposure to ensure the leaves aren’t too bright or too dark—overexposed leaves lose their texture, while underexposed ones look dull. Fine-tuning white balance is key to keeping greens natural and realistic. If your photo looks too yellow or blue, use temperature and tint sliders to correct the hues.

Then, carefully increase vibrance and saturation to make your plants pop without overdoing it. Subtle enhancements can make greens look rich and inviting while maintaining a natural tone that viewers love.
Quick Tip: Always preview your image on different screens to ensure colors look consistent across devices.
Trick 2: Enhance Texture and Detail
The beauty of plant photography lies in texture—the delicate veins of leaves, fuzzy stems, or intricate petal patterns. Increasing clarity, structure, or sharpening helps bring out these fine details. For macro or close-up shots, consider focus stacking, a technique where multiple photos taken at different focus points are combined for maximum sharpness. Using selective sharpening to emphasize the main subject while keeping the rest of the image soft.

A little detail enhancement goes a long way—too much sharpening can make textures look harsh and unnatural, so always find the right balance.
Pro Tip: Apply sharpening at the end of your editing workflow for the best results.
Trick 3: Clean & Simplify the Background
A cluttered background can distract from your main subject. Selective editing is your best friend here. Use blur tools to create depth, desaturate unwanted colors, or remove small distractions like stray leaves or dust.

If your camera didn’t achieve a shallow depth of field, simulate it during editing by applying a lens blur or background fade. The goal is to keep attention on the plant while maintaining a natural and minimal aesthetic.
Bonus Tip: Try using a gradient mask to softly fade the background while keeping the plant in sharp focus. It instantly gives your photo a polished, professional look.
Trick 4: Make the Colors & Mood Stand Out
Color grading can dramatically change the mood of your indoor plant photography. Experimenting with complementary backgrounds or contrasting tones to make your plants visually pop. For instance, a dark green monstera looks stunning against a warm beige or soft pink backdrop.

Add a gentle vignette or gradient to subtly draw the viewer’s attention toward the plant’s center. Adjust the warmth of the photo based on your desired vibe—use warmer tones for cozy, homey aesthetics or cooler tones for a minimal, modern feel.
Editing Hack: Use HSL (Hue, Saturation, Luminance) sliders to fine-tune specific colors—boost green luminance for brightness or reduce yellow tones to prevent oversaturation.
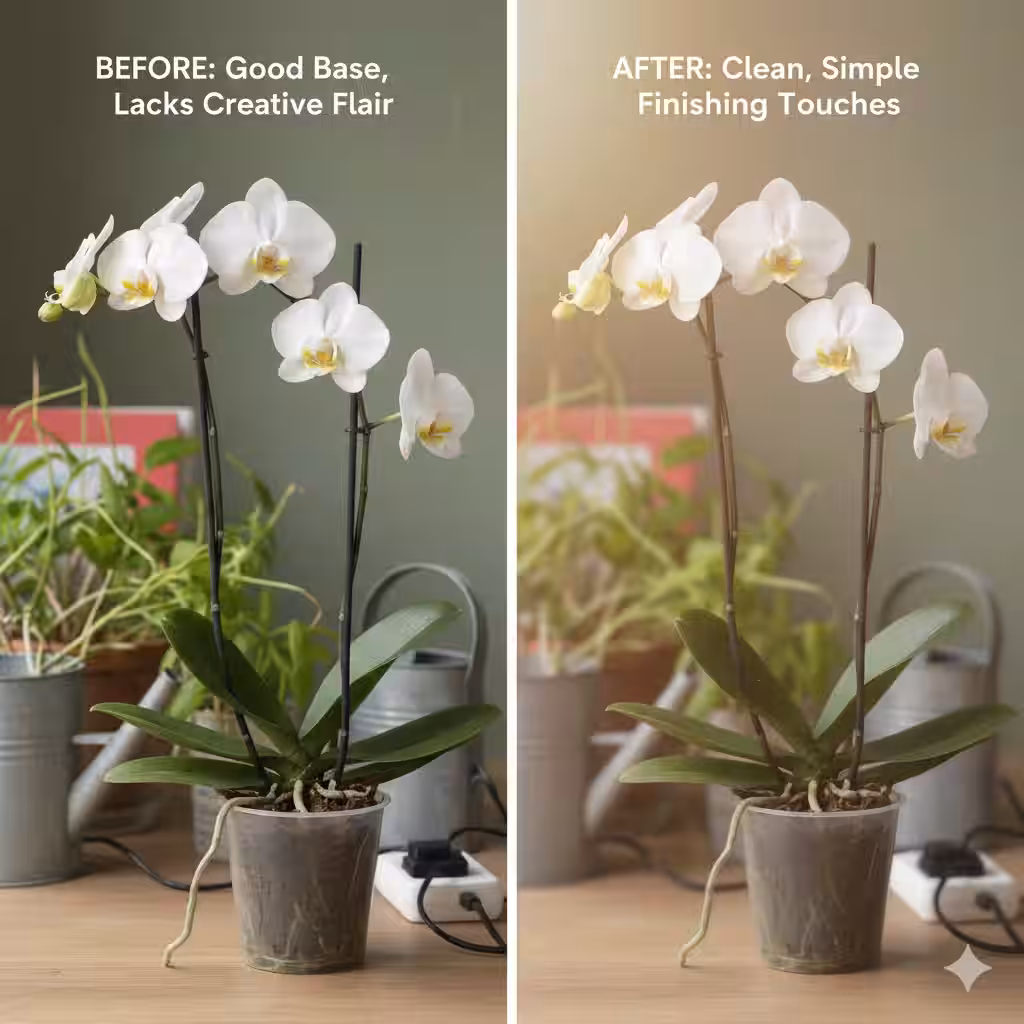
Trick 5: Apply Creative Finishing Touches
Once your main edits are done, it’s time for the fun part—creative finishing touches. Light filters can enhance your photo’s overall feel without overpowering it. A touch of bokeh, mild grain, or matte effect can add artistic flair and depth. Before exporting, check your image size, sharpness, and resolution—especially if you’re posting on social platforms. Oversized or compressed images can lose detail. Maintaining a consistent editing style across all your photos also helps build a cohesive plant photography portfolio or Instagram feed.
Finishing Tip: Save your favorite color and exposure settings as presets for future use. This not only saves time but also ensures your plant photos maintain a recognizable, professional look.
Post-Processing of Plant Photo: From Raw to Ready
Once you’ve captured your perfect shot, it’s time to refine it through a structured plant photography post-processing workflow. Editing doesn’t have to feel intimidating — following a clear, step-by-step process can make your indoor plant photos look crisp, balanced, and professional.
Step-by-Step Editing Workflow for Plant Photography
- Import Your Photos: Start by importing your images into a photo-editing tool like Lightroom, Snapseed, or Skylum Luminar. Shoot in RAW format whenever possible — it captures more detail and flexibility for color correction and exposure adjustments.
- Select the Best Shots: Go through your images and shortlist the sharpest, best-composed shots. Look for photos where lighting feels even, colors are rich, and the plant appears lively.
- Basic Adjustments: Begin by tweaking exposure, contrast, and white balance. These foundational edits bring balance and brightness to your photo, especially useful for indoor or low-light plant photography.
- Enhance Texture and Detail: Subtly increase clarity and structure to highlight the plant’s natural veins, stems, and petals. This step makes your greenery pop without over-sharpening, preserving a soft and natural aesthetic.
- Selective Cleanup: Use tools like healing brushes or selective masks to remove blemishes, background clutter, or dust spots. This helps focus attention on the plant and keeps the overall composition clean.
- Color Grading and Mood Setting: Adjust hues, saturation, and tone curves to create your desired mood. For warm, cozy vibes, lean toward yellow tones; for minimalist freshness, enhance cool whites and greens.
- Export for Sharing or Printing: Export your edited photos at the right size and resolution for their purpose — web, social media, or print. Exporting in high quality (300 DPI for print, 72 DPI for web) to maintain detail and sharpness.
Recommended Tools for Editing Plant Photos
- Lightroom (Mobile/Desktop): Excellent for color correction, exposure, and presets.
- Snapseed: Ideal for smartphone editing with selective adjustments and healing tools.
- Skylum Luminar: Great for AI-assisted edits that enhance textures and remove imperfections easily.
- Dedicated Plant-Photo Presets: Speed up editing with filters designed for greenery, soft tones, and natural light.
Batch-Editing Tips for Plant Lovers
If you photograph an entire plant collection or maintain a plant-care journal, batch editing saves time while keeping your visuals consistent.
- Apply the same preset across all images for a cohesive theme.
- Sync exposure and color settings for uniform lighting and tone.
- Organize your files by plant type or date for easy tracking.
Common Mistakes in Plant Photography & How to Avoid Them
Even the most passionate plant lovers can make small mistakes that reduce the impact of their plant photography. Knowing what to avoid can save you time and help your plant photos look crisp, natural, and professional. Below are some of the most common errors—and how you can fix them easily.
1. Overly Saturated Greens
While it’s tempting to make your plants look extra vibrant, over-editing the greens can make them appear artificial and flat. Instead, keep your saturation balanced. Adjust the HSL (Hue, Saturation, Luminance) sliders to refine tones subtly. A slight boost in vibrance is fine, but aim for natural shades that reflect the plant’s true beauty. Realistic colors always perform better in plant photography because they maintain authenticity.
2. Cluttered or Distracting Backgrounds
A busy background pulls focus away from your main subject. Avoid including random objects, cables, or patterned surfaces behind your plants. Use a neutral backdrop or blur the background during editing to create depth. This approach ensures that your indoor plant photography highlights the plant itself, not the surroundings.
3. Poor Lighting Conditions
Lighting can make or break a photo. Shooting under harsh direct sunlight can create unwanted shadows, while low-light conditions may result in grainy or dull images. Always use natural diffused light, preferably near a window or during the golden hour. If your lighting isn’t ideal, you can correct it during post-processing by adjusting brightness and contrast.
4. Skipping Plant Cleaning and Preparation
One of the simplest but most overlooked steps in plant photography is cleaning your plant before shooting. Dust, dead leaves, or water stains can become more visible once the photo is edited. Wipe leaves gently, trim dead parts, and check for pests or dirt. A clean plant not only looks better in the frame but also requires less retouching later.
5. Ignoring Export Settings
You might nail every step—lighting, composition, and editing—but poor export settings can ruin your photo’s quality. If your plant photo looks blurry on Instagram or your website, it’s likely due to incorrect resolution or compression. Always export in the correct aspect ratio and size (300 DPI for print, 72 DPI for web). This ensures sharp, professional-looking images across platforms.
Bonus Tips: Plant Photography at Home – Smart Hacks
Mastering plant photography at home doesn’t require a professional studio setup—just a few clever tricks can elevate your photos instantly. These simple, budget-friendly hacks will help you capture your houseplants beautifully while keeping your feed cohesive and engaging.
Use a Reflector to Bounce Light
Lighting is everything in indoor plant photography. If you don’t have professional lighting equipment, use a simple DIY reflector such as a white foam board, aluminum foil, or even a light-colored wall to bounce natural light onto your plant. This technique softens shadows, brightens darker areas, and enhances the plant’s natural shine without harsh glare.
Add Water Droplets for Texture
Want to make your plant photos look fresh and lively? Lightly mist the leaves before shooting. Adding water droplets creates texture and dimension, giving your image a natural, dewy effect. It works especially well for close-up shots of succulents, ferns, and tropical plants where moisture enhances depth and realism.
Use Macro Mode for Close-Up Shots
For capturing fine details like leaf veins, petal edges, or fuzzy stems, switch your phone or camera to macro mode. This setting lets you focus closely and highlight textures that often go unnoticed. Macro plant photography is a great way to showcase the intricate patterns and natural artistry of your plants, making your images feel more intimate and professional.
Maintain a Consistent Feed Style
If you’re sharing your plant photos on Instagram or Pinterest, consistency is key. Stick to a similar color tone, lighting style, and editing preset across your posts. This creates a visually cohesive feed that reflects your personality and makes your page more recognizable. For example, you can maintain a warm, cozy aesthetic for boho plant corners or a cool, minimal tone for modern interiors.
Turn Your Collection into a Plant Journal
Documenting your plant growth over time is not only rewarding but also a great storytelling tool. Take monthly or seasonal photos of each plant from the same angle to track changes in size, color, or bloom cycles. Over time, this becomes a visual plant photography journal, showing your care journey and helping you learn about your plants’ progress under different lighting or watering conditions.
Conclusion
Editing is the secret ingredient that transforms ordinary plant shots into captivating masterpieces. By combining good lighting, composition, and post-processing, you can bring your indoor greens to life with texture, depth, and vibrant color. Pick your favorite plant, try these editing tricks, and experiment fearlessly—each photo will teach you something new about your style. Share your best captures or tag us to inspire fellow plant lovers. And if you want to enhance your photos effortlessly, try Smartli AI Image Processing—the smarter, faster way to perfect your plant photography with precision and creativity.
Plant Photography Technique FAQs
How to take good pictures of plants?
To take good pictures of plants, focus on lighting, composition, and angles. Use natural diffused light from a window or during the golden hour for soft, even tones. Clean your plant’s leaves to remove dust and ensure the background is clutter-free. Experiment with different perspectives—top-down, side view, or close-up—to highlight textures and patterns. Finally, apply gentle post-processing edits to enhance color and sharpness for professional-quality plant photography.
What is the 20-60-20 rule in photography?
The 20-60-20 rule is a composition technique used to create visual balance in photos. It suggests dedicating 20% of your frame to the foreground, 60% to the main subject, and the remaining 20% to the background. In plant photography, this rule helps ensure your plant remains the central focus while maintaining depth and context in the image. It’s especially useful when photographing plants in home interiors or garden spaces.
What is the 3:1 rule in photography?
The 3:1 lighting ratio rule helps control contrast between light and shadow. It means your subject should be three times brighter on the illuminated side compared to the shaded side. For indoor plant photography, this ratio creates gentle contrast and natural-looking depth, helping leaves and textures appear more defined. It’s perfect for achieving soft, realistic lighting without harsh shadows.
How to edit photos to make them look amazing?
Start by adjusting exposure, white balance, and contrast to achieve balanced tones. Enhance colors using HSL (Hue, Saturation, Luminance) adjustments to make greens and neutrals pop without looking over-saturated. Remove distractions using selective edits and fine-tune texture or sharpness for clarity. Tools like Lightroom, Snapseed, and Smartli’s AI Image Processing make editing easy—even for beginners—so your plant photos look clean, natural, and ready to share.
What’s the best lighting for indoor plant photography?
Soft, indirect light is ideal for plant photography at home. Place your plants near a window where sunlight filters gently through curtains. Avoid direct noon sunlight, as it can cause harsh shadows and blown-out highlights. Morning or late afternoon light gives your plants a warm, natural glow that’s perfect for detailed shots.
Can I take professional plant photos with my phone?
Absolutely! Modern smartphones are powerful tools for plant photography. Use the macro mode for close-ups, tap to focus on the main leaf or flower, and adjust exposure manually. Combine good lighting with steady hands or a tripod for crisp, detailed results. Editing apps like Snapseed or Lightroom Mobile can refine your final image beautifully.
How does Smartli help in editing plant photos?
Smartli’s AI Image Processing simplifies editing by automatically adjusting exposure, color balance, and texture while maintaining a natural look. It helps highlight plant details, remove unwanted background elements, and enhance overall photo quality in seconds. Whether you’re a beginner or an expert, Smartli gives your plant photography a polished, professional finish—quickly and effortlessly.


.avif)